


Privacy Trees Ornamental Trees Deliver & Plant "Before & After" Photos Tree Care About Us FAQ
Call Us: 425-343-2650


Care of Your Trees
[Please "Bookmark" this page for future reference]
Please pick a topic from the list below or simply scroll down the page:
My Trees Were Just Planted; What Do I Do Now?
Newly-Planted Trees' Appearance
Planting Trees Yourself--Tree Planting Instructions
Tree-Specific Comments
Emerald Green Arborvitae--Yearly Maintenance
Cedar Trees--Yearly Maintenance
Thundercloud Plum--Yearly Maintenance
Winter "Bronzing" and Interior Branch Die-Back of Cedar Trees
My Trees Were Just Planted; What Do I Do Now?
Thank you for purchasing trees from NurseryTrees.com. During the first year or two your newly-planted trees are going to require some special attention from you so that they do well. We are here to support you, and if you don't find the answer to your questions on our website, please don't hesitate to contact us.
So, to begin, please take the following steps:
1. "Bookmark" this "Care of Your Trees" section so that you can return to it easily.
2. The most important thing for you to pay attention to now is Watering. 90% of all problems with newly-planted trees are because the homeowner didn't water them. Don't be one of "those". There are specific instructions for Watering below.
3. Read this entire "Care of Your Trees section--you'll find general comments about watering, fertilizing, and what to expect from your trees; and then specific care instructions for Arborvitae, Cedar and other trees that we sell. You can read the entire section by just scrolling down from here.
--Important: Please Read This Whole Section ASAP--
Proper watering of your new trees is very important, particularly during the first year after they are planted. New trees have compact, burlapped rootballs and until they have had time to put out roots the only water your new trees can access is water put right on the rootball. That’s why we’ve installed a watering system for you—to be sure the water gets where it is needed. Most problems with new trees are water-related. If you pay attention to your trees and follow these directions, you should be fine.
First Watering After Planting
If Your New Trees Are Planted November-March: Don’t worry about this; the trees are dormant and the rain will take care of it; plus freezing weather can damage the watering system we’ve installed for you.
If Your New Trees Are Planted April-October: It is a good idea to "water in" newly-planted trees. This means to saturate the ground in order to fill in micro-air pockets in the soil. So the first time you water the trees--usually using the watering system we have provided you with--leave the water on a good long time to accomplish this.
When to Start and Stop Watering During the year
Trees don’t need to be watered when they are dormant—roughly November-March. Sometime in March/April the soil will start to dry out from the warmer weather and that is when you should start your watering (we suggest you start checking the soil in late March). Watering continues throughout the spring/summer/fall until late October when the leaves have fallen off the trees. You don’t necessarily need to water every day, but you do need to pay attention to the dryness of your soil—you don’t want the soil to totally dry out. These instructions will give you further information about when to water during this time.
Watering during the first spring/summer after planting is critical to your trees’ success—they will not survive if you don’t water them properly their first year. We recommend that you also water well the second year after planting, particularly during hot days or if we planted larger trees for you. Your watering system will last 4-5 years and you can keep using it—your trees, even though they are established, will appreciate water during the hot times of the year.
Normal Watering
The basic goal of watering is to prevent the roots of your trees from drying out. If you wait for brown branches to appear, if may be too late. So stay on top of this, please.
How quickly roots can dry out depends on the characteristics of your soil, how much rain there has been recently, other vegetation in the area, and what type of tree is involved. Note that some trees are so thick and bushy--such as Emerald Green Arborvitae--that even if it rains the tree may not get enough water on the rootball where the water is needed--as the tree establishes itself and pushes roots out beyond the "drip-line", this becomes less of a concern.
The first time you use your watering system, let it run for 20 minutes and then test whether you have watered enough. Test this by feeling in the soil with your fingers 6-8 inches down in the soil beside the rootball of one of your new trees. If the soil is moist down 6-8 inches, then you are in good shape; if it is not wet that far down, then you need to water more. How long you need to leave your watering system on to achieve this soil moisture will depend on how well your soil retains water and your water pressure, so there is no hard-and-fast rule. You need to leave your system on long enough to moisten the soil down 6-8 inches as described. Once you've worked with your system a little bit the necessary time will become clear. Usually the watering time is about 15-20 minutes, 3-4 times per week, but everyone's soil is different. Sandy soils may need more frequent watering and clay soils less frequent. And during hot weather you may well need to water every day.
You don’t need to do the “6-8’” test on every new tree, but you do want to check that every sprayer is putting out about the same amount of water. Simply walk along the line and look at them (see next section for how your sprayers work). If your trees are on a slope you should test the upper and lower trees to be sure the upper trees are getting enough and the lower aren’t getting too much.
It is possible to overwater your trees. If the trees are overwatered they will yellow and die. You want to keep the soil “evenly moist” and at a “cookie dough” consistency” at 6-8” down. If it’s raining steadily and hard for a few days in a row, you don’t need to water your trees, except for possibly thick, bushy trees that slough off the water like the Emerald Green Arborvitae.
The Watering System We Installed for You
If we planted your trees we almost certainly installed a watering system for you to use. The cost for the watering system is included in our “Planting Charge”. At noted earlier, the purpose of this system is to get water right on the new trees’ rootballs, which is where they need it. We have used this system for many years, both here at the tree farm and also when planting for Customers. It is simple and easy to use once you understand it.
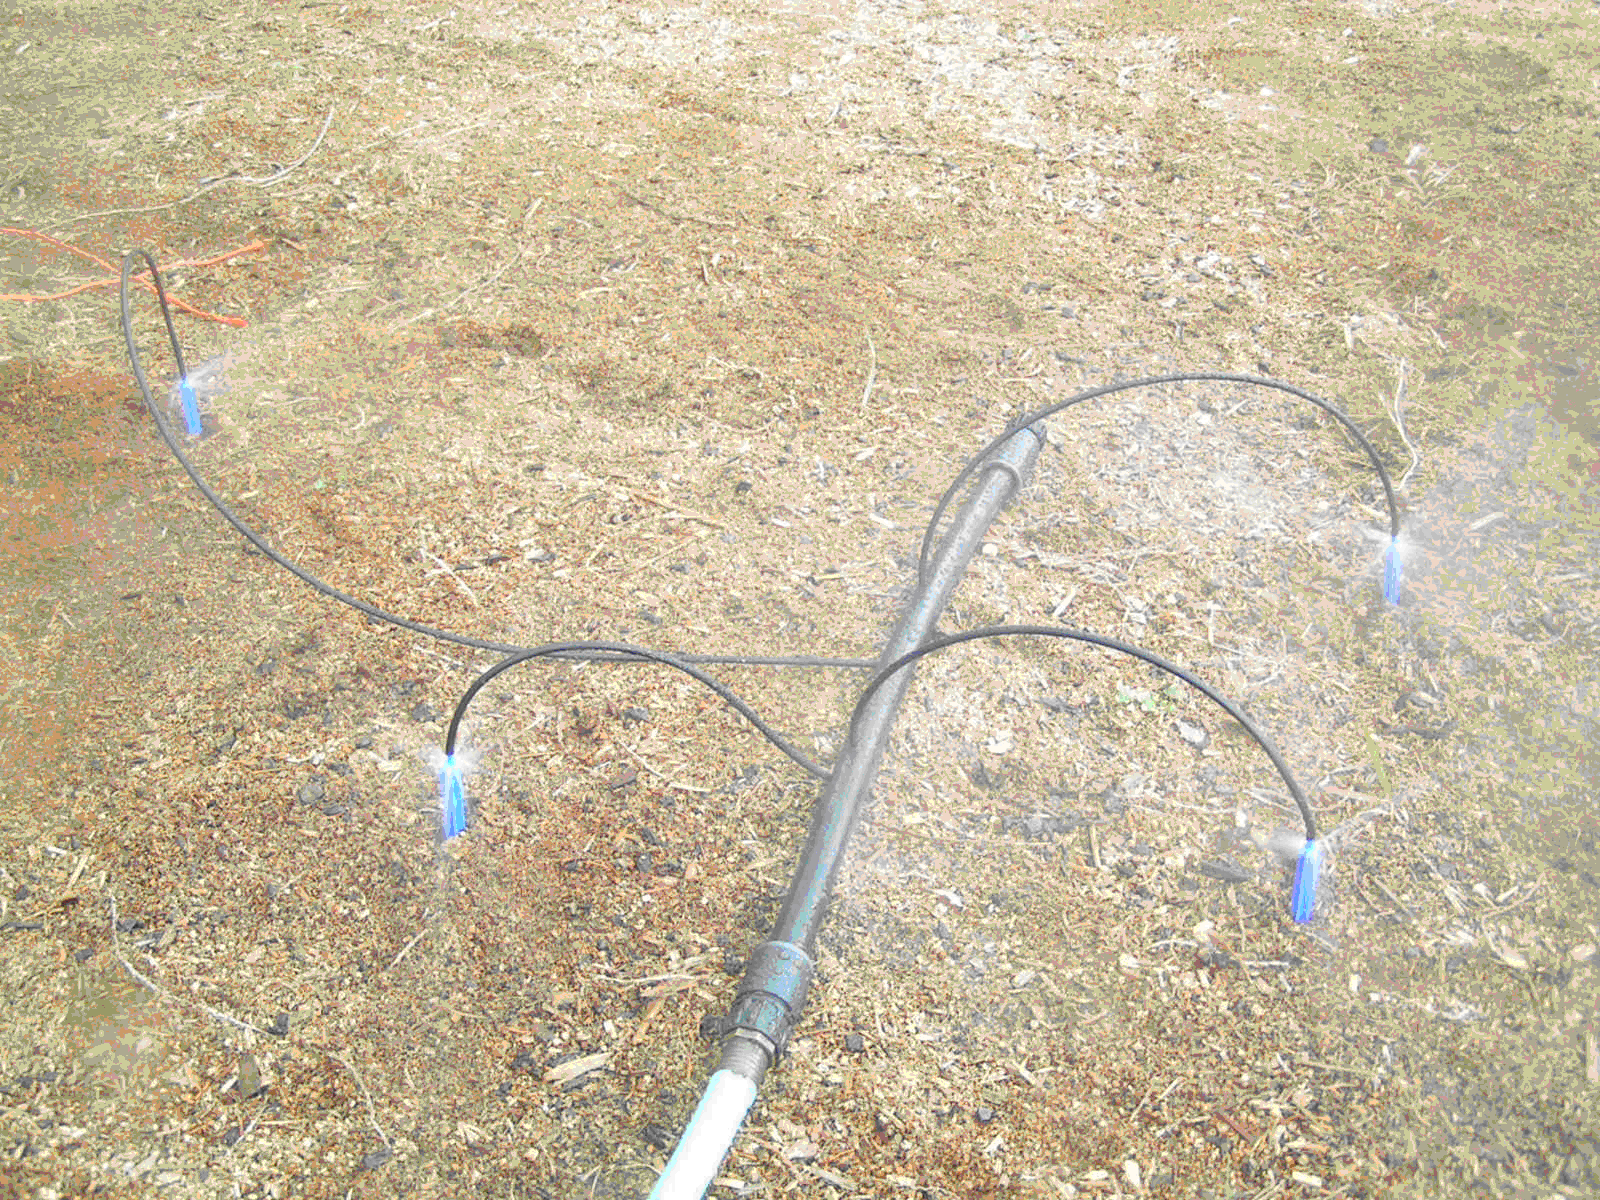
Model of the Watering System Components
Main line connected to garden hose, with spaghetti lines & blue sprayers
The watering system is composed of:
1. The black “Main Line” which connects to your garden hose. The Main Line runs along your new trees;
2. Smaller black “Spaghetti Lines” provide water to the Sprayers; and
3. The Sprayers which spray a light mist of water on the trees’ rootballs. Sprayers are either Blue, which spray a 360 degree pattern, or Black, which are directional.
You can see how the system is put together here.
Checking Your Irrigation System
It is important to periodically check that your irrigation system is working properly. Sprayers can become clogged, animals can move hoses, grass can grow up and block a spray, and your pressure can change in hot weather. So simply walk along your watering system and check that it is working. Adjust as necessary.
Cleaning & Adjusting the Sprayers: Sprayers (blue or black) can become blocked but can easily be fixed--simply pull the sprayer out of the small tube and re-insert. You can adjust a sprayer’s spray by pulling it further out of the Spaghetti line or pushing it further in. The further it is pulled out, the more it sprays. IMPORTANT NOTE: the sprayers are different at each end—one end has grooves for spraying, the other end is solid so that it totally stops the flow of water when inserted. When working with the sprayers be sure you get the right end in the spaghetti line.
If a sprayer gets broken or lost, please let us know and we will mail you replacements (usually for no charge).
Specifications:
Blue Sprayers—Spray a 360 degree pattern (circular).
PSI GPM GPH
15 .15 9.0
20 .18 10.8
25 .21 12.6
Black Sprayers—Spray a 160 degree pattern (directed).
15 .21 12.6
20 .25 15.0
25 .29 17.4
Note: This is not a permanent system. It connects to a garden hose, is used for 1-5 years and is then discarded.
Please read this entire section and if you have any fertilizer questions don’t hesitate to contact us. Please note that these are general guidelines and our Foreman may have given you different instructions.
BASICS: We have applied an organic starter fertilizer at planting time. We use Dr. Earth RootzoneTransplant/Starter Fertilizer. This product contains specialized soil microbes that assist with nutrient uptake and root development.
We don’t feel that trees need to be fertilized after they are established (or usually even before they have become established) but sometimes fertilizing is necessary. For conifers and Laurels, we recommend using a slow-release formula that is designed for evergreens, if something a bit “stronger” than Dr. Earth Rootzone is recommended. These products are also fine for ornamental trees.
The "Big 3" primary nutrients of fertilizer are Nitrogen, Phosphate, and Potash, expressed in order like this: "10 - 15- 12". For this discussion we will only worry about the first number, Nitrogen. We don’t recommend using a product that is really high in nitrogen – 10 or 12 is fine, as a higher nitrogen content could burn the trees or shrubs. However, sometimes established trees may need additional nitrogen, and nitrogen at 15 or 16 is fine to use judiciously.
TIMING: If extra fertilizer is needed, we generally recommend fertilizing starting in mid March through early September, or feeding every 3 months depending on where you fall on this timeline in regards to when your trees were planted. These are general guidelines and our foreman may have given you different instructions depending on the specific needs of your trees and/or shrubs.
APPLICATION: When applying fertilizers, it is important to read the entire label, and apply the product according to instructions. Please follow any applicable precautions. Using these products not in accordance with the label could damage your trees and could affect the warranty.
A NOTE ABOUT PETS AND SMALL CHILDREN: Pets and small children can obviously disrupt the soil around the trees and even possibly ingest any fertilizer that has been applied. The Dr. Earth Fertilizer that we use is an organic product and it is listed as safe for pets and wildlife, and 90% of it is below-ground. Other fertilizers will vary in this regard, both in terms of safety and application. If you have pets or small children in your yard, we suggest that you keep them away from newly-fertilized trees.
PURCHASING FERTILIZER:
Below are a few options that can be found on Amazon. You may also be able to find these products at your local garden center or hardware store. Please note that availability may fluctuate. If you are unable to find any of the listed products, a slow-release fertilizer that is designed for evergreens will be fine. Just make sure to keep the nitrogen no higher than 10 or 12 unless otherwise directed by our foreman. Also, if you are unable to find these specific products, a high-end retail nursery should be able to help as they usually have well-trained staff that can assist you with products.
Amazon.com: Lilly Miller Rhododendron Evergreen And Azalea Food 10-5-4 16lb : Everything Else
Amazon.com : Espoma TR4 4-Pound Tree-Tone 6-3-2 Plant Food : Fertilizers : Patio, Lawn & Garden
For established trees if recommended by foreman:
Pruning is a matter of personal taste. Some people like a full, bushy tree from the ground up; some like to see the trunk. Pruning can also depend on the tree—with the beautiful white-barked Jacquemontii Birch, most people like to prune the lower branches so that a lot of the trunk shows. Simply use garden shears to cut off the branches as close to the trunk as possible. The best time to prune is when the tree is dormant in the winter, but light pruning can take place anytime.
"Mulching" means to put down a layer of bark or compost on top of the soil at the base of your new trees. Mulching your trees after planting can help to conserve soil moisture, help regulate soil temperature and help suppress weeds. Plus it gives a “finished” look. The two basic types of mulches are “bark” and “compost” (compost being a composit of organic materials). We prefer compost over bark as compost has the advantage of supplying nutrients and it helps to build soil structure, although you don’t want compost with fresh manure or fresh wood chips. Compost also has the appearance of nice, rich soil. When applying mulch, make sure to keep it 4-6” from the trunk and don’t cover any low hanging branches. Apply the mulch no deeper than 2” to 4”. Mulch can be applied spring and fall.
Newly-Planted Trees' Appearance
Like people, trees don't like to be uprooted and moved around. It stresses the tree's systems and causes minor damage, often making the trees not look as good as they will once they are established. Some examples:
Evergreen Trees: When trees such as Arborvitae, Cedar, and Douglas Fir are moved
and planted, it is inevitable that some small branches will be damaged or
broken. This damage, which is usually around the bottom of the tree, can take several weeks to show up as brown branches.
Also, because evergreens have so much surface area, if the tree's systems are
stressed it can show up as browning or yellowing, again often in the lower areas
of the trees. This is often disturbing to the homeowner but it is usually
nothing to worry about. If you wish you can prune off the broken branches,
or just leave them and they will fall off on their own. New growth will
replace the damaged branches.
Deciduous trees: The stress of planting may cause leaves to be smaller and some flowering seasons can be missed. Here again, some small branches can be broken, which will turn brown over a few weeks. Usually, all of this corrects itself by the next growing season.
So it is good to keep an eye on your trees and note any changes, but don't be overly concerned. And we are here to help if you have questions.
Some Tree-Specific Comments
Emerald Green Arborvitae Yearly Maintenance
Besides watering (which is the most important), you should consider two "maintenance" items for your Emerald Green Arborvitae:
1. Clean out dead branches:
Each Fall, all cedars including Arborvitae experience die-back in their interior branches. This causes the accumulation of small dead branches and material inside the tree. Each year you should go along your row of trees and clean out the dead material--you can just pull it out with your hands, or some people spray it out with a hose and nozzle.
2. Spider Mites:--To Spray or Not To Spray:
Spider mites are present in the
The great majority of Emerald Green Arborvitae plantings will not have a problem—an Arborist we work with estimates that only 5% of unsprayed Arborvitae will develop an infestation. Spider mites can be controlled with preventative spraying (as we do twice a year at the nursery) or after a spider mite infestation has been discovered if you catch it early enough.
As a preventative measure, you can spray your trees with a Horticultural Oil during the trees' dormant season--roughly November-April. This is very effective at preventing problems, and the horticultural oils are very safe. Try to spray all surfaces of the tree. If you are spraying because you know you have spider mites, or at a later time, spray with a "miticide" that you can buy at Home Depot, Lowes. Be sure you buy a "miticide" and not just an insecticide.
The first sign of spider mites is usually some browning of the branches, often in the lower part of the tree. (note that newly-planted trees can have this appearance as the result of small broken branches during planting, and not spider mites). To test for spider mites: on a dry day put a piece of white paper under some Arborvitae branches and shake vigorously. You’ll likely get a bunch of “stuff”—dried twigs, small green branches, specks of things, and some bugs. The bugs that are bigger and move quickly are not a problem—the spider mites are about the size of the period at the end of this sentence and they move very slowly. You can see them better if you look at them under a magnifying glass.
3. Check Your Irrigation System: It is important to periodically check that your irrigation system is working properly. Animals can move hoses and your pressure can change in hot weather. So simply walk along your watering system and check that it is working. Adjust as necessary.
Excelsa & Western Red Cedar Yearly Maintenance
These trees tend to accumulate small dead branches and material inside the tree. Each year you should go along your row of trees and clean out the dead material--you can just pull it out with your hands, or some people spray it out with a hose and nozzle.
Spider mites can, in rare cases, affect cedar trees. If you notice that your tree isn't looking too healthy, please see the discussion of spider mites in the previous section. See also the next section.
Check Your Irrigation System: It is important to periodically check that your irrigation system is working properly. Sprayers can become clogged, animals can move hoses, grass can grow up and block a spray, and your pressure can change in hot weather. So simply walk along your watering system and check that it is working. Adjust as necessary.
Winter "Bronzing" & Brown Interior Branches of Excelsa Cedar and other Cedar
Many cedar trees, particularly newly-planted ones, will turn a somewhat bronze color on top in the Fall and during cold weather. At roughly this same time it is also common to have die-back in some interior branches (see photos below). Both of these characteristics can cause concern to new tree owners--but don't worry, the largest cedar trees in the forest do this and now that you know about it you will notice it on cedars in your neighborhood. As to the die-back, if you wish you can clean-out the dead materials by hand or with a hose, or just leave it and they will naturally fall off; to be replaced by healthy new green foliage in the Spring.
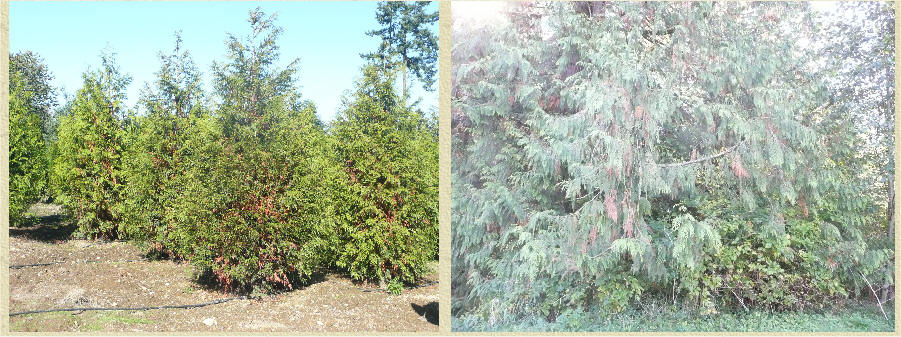
Fall interior "flagging" on excelsa cedar for sale at our nursery (left) and a mature Western Red Cedar at the back of our property (right).
You will see this on many cedars and it is nothing to worry about.
These really-beautiful trees, like most fruit trees, have
somewhat of a susceptibility to insects. We like to spray our Thundercloud
Plums each Spring to avoid this. You can purchase an insecticide at your
local garden center and an inexpensive sprayer at a hardware store..
English Laurel doesn't like to be moved or transplanted. It is very common for newly-planted Laurel to drop leaves and generally not look to good after it has been installed. This is natural and, as long as you are watering correctly, new growth will replace the fallen leaves.
Laurel can turn yellow if it isn't receiving enough nitrogen or iron. If you think this is happening, apply some high-nitrogen/high-iron fertilizer from your local garden store.
PLANTING INSTRUCTIONS
Note: We strongly suggest that only smaller trees be planted by homeowners. Trees can be easily damaged by mishandling the rootballs, branches can be broken, etc.; and trees are so heavy that they can be dangerous for a non-professional to handle.
Apply transplant fertilizer as per package instructions. Do not use “regular” fertilizer – we like to use a starter fertilizer product made by Dr. Earth
1) Dig holes the same depth as the rootball. You can dig the hole a bit wider than the rootball. You want to make sure that the tree is planted at soil level or slightly above soil level.
2) Leaving the burlap in place, place the tree into the planting hole making sure that it is not sitting lower than the soil line.
3) Remove the twine from the rootball and back- fill the hole with soil. Do not mound soil up around the trunk of the tree.
4) Gently tamp down the soil to firm up the soil around the rootball. Water the tree in – soaking the rootball and surrounding soil.
5) Stake trees for one year unless you are in a very high wind location. If so, you can leave the stakes on for two years. Just be sure to check them after one year and loosen them slightly to keep from girdling the trunk/branches. Note: Emerald Green Arborvitae do not require staking unless you are in a high wind location. You won’t need to stake Laurels.
6) Apply mulch or compost 2”- 4” thick. Do not mound up onto trunk, and do not apply thicker than 4”.
7) By far the most important thing you can do for your trees is water them properly. This almost always means that you should install a temporary watering system such as a soaker hose, drippers or sprayers. You can't water new trees from the side--you need to be sure the water is put right on top of the rootball as that's where all the roots are. 90% of problems with new trees is improper watering.
Be sure to put in an effective watering system--a soaker hose or sprayers that puts water right on the new trees' rootballs. Hand watering or using a sprinkler from the side seldome works effectively. This is very important advice as to the success of your trees. Keep your Trees evenly moist – not waterlogged – for the first growing season (April-October). In spring and fall, you may not need to water at all if it’s raining regularly, or you may need to water as often as every other day if we have a warm, dry spell. You do not need to water in winter when the trees are dormant--roughly November -March. Typical summer temperatures usually require watering every other day, or possibly every day depending on your soil. See the "Watering Your Trees" section above for further information about watering.
Other sections of this "Care of Your Trees" page of our website have more detailed information about watering, pruning, etc. Please review those sections as well and we suggest that you "Bookmark" this page for future reference.
Contact Us
We are here to help. If you have questions please don't hesitate to contact us:
info@NurseryTrees.com
425-343-2650
Patience
We all like instant results, but trees teach us to be patient.
__________________________

__________________________
OTHER USEFUL RESOURCES:

__________________________________

This Chart helps you easily compare mature sizes, growing conditions, etc.
for all of our privacy trees.
__________________________________
__________________________________
See our Trees Growing in the Fields!

We have a beautiful 8 minute drone video of our Snohomish tree farm
with many of the trees identified. Click here
__________________________________
Studies: Trees Add Value to Property
__________________________________

Privacy Trees: We are a nursery tree farm specializing in Privacy Trees for screening. We sell retail & wholesale, for residential and commercial projects and we "deliver & plant" our trees. Our most common project is planting a line of privacy trees for a homeowner. We have several thousand privacy trees growing at our Snohomish farm. Plus we have many years' experience in "what works where", professional planting services, ongoing support, and thousands of satisfied customers. Buying directly from a grower has great advantages--fresh trees, great selection, and low prices--you maximize your purchasing power. We also have privacy trees that are not available elsewhere, such as our "Hedged Privacy Trees" and "Thin Man" Arborvitae. You can see our hedged and natural privacy trees in our beautiful 8 minute YouTube Farm Video.
Ornamental Trees: We also have a nice selection of Ornamental Trees, with many of our trees being on the "Great Plant Picks" list for the Pacific Northwest.
Delivery & Planting: We usually deliver & plant our trees for Customers. Click here for more information.
Free Estimates: We will help you determine which trees are right for your project, and provide you with free, no-obligation estimates. This is often accomplished by e-mail and phone, usually first using our online Free Estimate Request Form. Where necessary, we will send one of our experts out to review the project (no cost or obligation). More information
Location: We’re conveniently located just 15 minutes north of Woodinville. Here's a link to our "Directions" page. Please also read the next section.
Farm Visits: We are a working farm not a retail nursery so we don't keep regular retail hours; instead we set up appointments so that we can focus on your project. This is particularly important during our busy seasons. Here's a link to more information about why "appointment only" is the best approach. So please set-up an appointment instead of "just coming out". Thank you. (425) 343-2650; info@nurserytrees.com.
Covid-19 Precautions: In accordance with the Governor's directives we have made some changes in the way we do things. For a detailed break-down of these steps please see our "Covid-19 Precautions" webpage.
Payment: We don’t require any money “up front”—you only pay when the job is completed (unusual exceptions to this are large/special projects or lengthy “holds” on trees). Be careful of contractors asking for “up front” money; they might not come back!
Warranty & Support: When we plant your trees we include staking (if necessary), transplanting fertilizer, and an easy-to-use watering system that hooks into your garden hose. More information. We also give a one year Warranty on trees we plant, for no additional charge. More information We have a detailed “Care of Your Trees” section of our website, and provide ongoing support--we're available to answer your questions as your new trees grow. More information
Customer Service: We pride ourselves on our Customer Service—real people answering the phone. We have an "A+" rating with the Better Business Bureau (their highest rating), are an Angie's List Super Service Award winner, have excellent reviews on Yelp, Google, etc. and a 100% satisfaction rating with eBay.
Our Business History: We planted our first trees in the summer of 1995 and our "workforce" consisted of Mom, Dad and 3 young children. Today we have a dedicated, experienced staff, most of whom have been with us for many years. See: "About Us" for our farming history.
Contractor Registration: NurseryTrees.com, LLC is a registered Washington State contractor (License Number: NURSEL*956J1). More information Be sure to hire a registered contractor -- to go to the Department of Labor & Industries website to check a contractor's registration, click here. As it says there: "Unregistered contractors carry no bond or insurance to protect consumers. Consumers can face serious issues if anything goes wrong on a job." These liability risks are in addition to fraud, poor workmanship, worthless warranties, etc. We are fully bonded and insured, of course.
Customer Satisfaction: Most important of all is what our customers think of us:
"I am really pleased with your work. You saved me several thousand dollars, steered me away from trees that wouldn't work, provided healthy and beautiful trees, did a great job planting them, and did everything on time and on schedule. You can quote me." Jo, Vashon Island
"Our privacy bank of trees has done nothing but grow well into maturity. Our back yard and deck area is totally private and the 10 trees your team planted [in 2005] are rich, leathery and dark green. We remark on them every day it seems. Please include me in any of your "Testimonials" as you would be hard pressed to find a more satisfied customer." Jim, Port Orchard
"For quality vs. value, your trees are the best landscape purchase I’ve ever made." Jeff, Seattle
"Michael, I just wanted to pass along a note to tell you how thrilled I am with the trees. The effect they have brought to our new courtyard in the front of our home here in Seattle has exceeded my expectations!" Chip Hanauer, Hydroplane Driver--Click Here to see his project.
"I work in customer service so I know good service when I experience it and you have my top rating. I would definitely recommend you to anyone who needs new landscaping. Thanks again.” Carol, Camano Island
"The [new] trees were a great privacy feature when we sold the last house! We now have a much larger space we want to talk with you about . . " Katherine, Fall City
“My compliments to your crew. We’ve had a lot of contractors working on our house recently and we’ve seen the entire range; and your guys were excellent. The trees make things look so much better—I started smiling as soon as I saw them going in." Holly, Queen Anne
"You guys are the best nursery I've ever done business with! And I have dealt with a few. You did what you said you would, on time with attention to detail rarely found. From the beginning of the quote process all the way through to the last detail you made it easy. And you work to ensure that the trees will thrive after planting with detailed advice, a complementary irrigation system, and a website filled with useful information. Most nurseries will just dump off the goods and tell you best of luck, put some water on them. You provide a quality product that sets you apart. Your crew was friendly, polite and operated as a well organized team. I would recommend you without hesitation! Thanks for doing a great job!” Ryan, Buckley
"We can not believe how beautiful your trees are. The privacy is unbelievable. If you ever need a testimonial let us know. Our yard is perfect! We sit there and say "my oh my”! Suzanne, Tacoma
"I don't think I've ever been as happy with something I've purchased." Sarah, Sammamish
Many More Testimonials (click here)

Our Convenient Location
15 minutes from I-405/Bothell-Woodinville
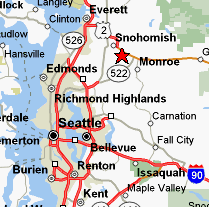
View Directions to our location.
Sales by "Appointment Only", please
Serving Washington State Since 1995
13510 Old Snohomish-Monroe Road
Snohomish, WA 98290
425-343-2650
(425) 953-5780 fax
Sales by "Appointment Only", please
Privacy Trees Ornamental & Landscape Trees Photo Gallery Care of Your Trees
Delivery & Planting Directions & Hours About Us/Contact Us
Privacy Policy, Website User Agreement, and Website Advertiser Agreement Site Map
Copyright 2024, NurseryTrees.com, LLC
